Friday 30 March 2018

roses on galaxy nail art


hi fairies,
there’s a lot going on in this nail art and it looks quite complicated, but it actually isn’t! it’s two nail arts in one, you can stop at galaxy one without adding roses, I love galaxy nails, they’re so easy to do and they look stunning! Or you can add roses on a monochrome background if you prefer, they would look really nice!
For the background I applied two coats of a black nail polish all over my nails, and when it was dry I dabbed  yellow, pink and light blue on each nail using a cosmetic sponge and placing colors randomly; I added one coat of an iridescent glittery nail polish to help blending each color into one another and to give the background silver and purple iridescences. With a dotting tool I placed random white dots on each nail, and then I started drawing roses: first of all I painted irregular purple circles on my nails, and then I used a tiny nail art brush and white acrylic paint to add petals, and I filled them in with pink. That’s it, I hope you like it!

roses_galaxy_nail_art


Italian version:

Ciao fatine,
Questa è una nail art ricca e non sobria, che sembra anche piuttosto complicata ma che, in realtà, non lo è! Si tratta di due nail arts in una, potete fermarvi dopo aver realizzato lo sfondo senza aggiungere le rose, le nail art che rappresentano la galassia a me piacciono molto, sono facilissime da fare e il risultato è eccezionale! Oppure potete aggiungere le rose su uno sfondo monocromatico, risalteranno e la nail art sarà molto femminile!
Per lo sfondo ho applicato due passate di smalto nero su tutte le unghie e, una volta asciutto, ho picchiettato sopra del giallo, rosa e celeste usando una spugnetta e non seguendo un ordine preciso; ho aggiunto una passata di uno smalto glitterato iridescente che ha aiutato a rendere lo sfondo omogeneo e ha aggiunto riflessi argentati e viola. Con un dotting tool ho aggiunto dei pois bianchi in ordine sparso,e  poi sono passata a disegnare le rose: come prima cosa ho disegnato dei cerchi viola dalla forma irregolare, e poi ho usato un pennello sottile da nail art per dipingere i petali, che ho colorato di rosa. È tutto, spero vi piaccia!

roses_galaxy_nail_art

Products used:

world of beauty pronails keratoplus base coat

kiko perfect gel duo top coat

kiko poker nail lacquer nr 06

kiko nail polish nr 290

kiko power pro nail lacquer nr 04

kiko power pro nail lacquer nr 41

catrice nail polish prismatic effect top coat

Americana acrylic paint in white, pink, red,black

roses_galaxy_nail_art


Wednesday 28 March 2018

Eye makeup look sea foam halo


Hi fairies,
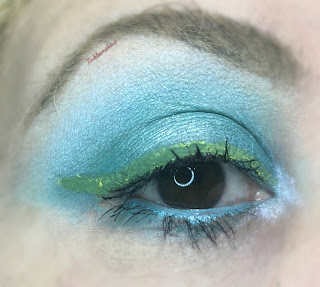
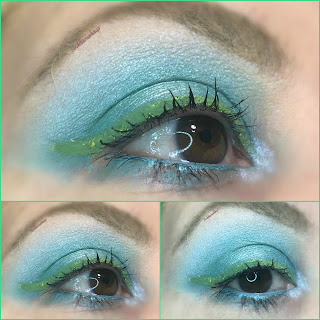
I’ve started this look by blending a matte teal in the crease using a fluffy brush, and then I used a matte grass green eyeshadow in the outer and inner corner and I blended it very well, I used a blending brush to apply it to get a defused result. I intensified the outer corner with a tiny bit of forest green eyeshadow. In the middle of my lid I applied a shimmery gold with a green hue to it, and I went back to the matte green because I lost some of its intensity while applying the shimmery color. For eyeliner you can go with a classic black one or you could choose a colourful one like I did, either way it will look good! I completed the look with some mascara, and that was it , I hope you like it!

eye_makeup_look_seafoam_halo

eye_makeup_look_seafoam_halo

eye_makeup_look_seafoam_halo


Italian version:

Ciao fatine,
Ho iniziato questo look sfumando un ombretto opaco verde azzurro nella piega dell’occhio usando un pennello da sfumatura, e poi ho usato un ombretto opaco verde prato nell’angolo interno ed esterno dell’occhio e l’ho sfumato molto bene, ho usato un pennello da sfumatura per applicarlo e ottenere un risultato sfumato. Ho intensificato l’angolo esterno con una punta di ombretto verde bosco. Al centro della palpebra ho applicato un color oro luminoso con sottotono verde, e poi ho ripreso il verde opaco perché aveva perso un po’ di intensità mentre applicavo il colore metallizzato. Come eyeliner potete scegliere un classico nero oppure uno colorato come ho fatto io, staranno bene entrambi! Ho completato il look con del mascara, ed è tutto, spero vi piaccia!

eye_makeup_look_seafoam_halo

eye_makeup_look_seafoam_halo


eye_makeup_look_seafoam_halo

Products used:

nyx waterproof eye primer

urban decay eyeshadow foxy

sugarpill cosmetics mono eyeshadow in mochi

kiko smart eyeshadow no 23

colourpop cosmetics powder shadow muscle beach

kiko infinity eyeshadow no 265

kiko infinity eyeshadow no 260

kiko infinity eyeshadow no 278

wycon mono eyeshadow no 1

about face loose pigment in misty maiden

kiko smart eye pencil no 818

nyx vivid brights eyeliner in envy

la girl boosting lash mascara


Tuesday 27 March 2018

One product review revecen moisture shine lip gloss


Hi fairies,
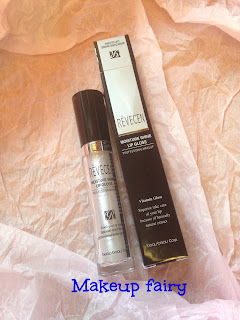
I found this lip gloss in the Tinkerbell memebox (here you can see the unpacking) and I’ve used several times before talking about it. I’m not a fan of lipgloss, I’ve never been even when they were trendy, I’ve always loved bold and matte lips and I hate when my hair got stuck to my lips, which happens all the time when I’m wearing a lip gloss. Unfortunately Memebox no longer ships worldwide so I could try just one of their amazing box!

Let’s see how it’s described: enriched with olive oil, this lip gloss in glittering white and beige created a colorless yet delicately glittering and plump lips while leaving lips super moist without being sticky at all. Full size price 16 $ for 7 ml.


revecen_moisture_shine_lipgloss_review

What I like: it comes in a see through tube with a regular doe foot applicator. It’s easy to apply, it’s not too gloppy and it’s lightweight, which is pretty rare for lip gloss at least in my experience. The color I got is transparent with silver glitters and I really like it because it looks like fairy wings or dew drops; when applied on its own it just gives shine and lots of shimmer when light hits it, but I also love to use it as a lipstick topper to make my lips look fuller or to slightly change my lipstick shade. It works great because it’s very thin so I don’t feel my lips stuck together, it just adds a subtle sparkly touch! It doesn’t smudge because the consistency is just perfect, I can use it without a lip pencil if I feel like it and I don’t have to worry to have it all over my face. It’s full of glitters but they’re not chunky, I can’t feel them at all on my lips. Lasting power is medium.

What I don’t like : it’s one of the best lip gloss I’ve ever tried, if I have to find a fault I would say it’s a bit too pricey for my taste: I wouldn’t spend 16$ on any lip gloss, ever, because to me it’s just not worth it as it’s not a product I reach for. If you love lip gloss though I definitely recommend this one because it’s very comfortable and it looks really nice.

My verdict: If I had to buy a lip gloss I would buy this one mostly because of its texture, which is lightweight and comfortable, and also because of the fine glitter in it. I give it a thumb up, you will love it if you love glossy lips!

revecen_moisture_shine_lipgloss_review

Italian version:

Ciao fatine,
Ho trovato questo lucidalabbra nella Tinkerbell Memebox (quitrovate il post a lei dedicato) e l’ho usato diverse volte prima di parlarvene. Non amo molto i lucidalabbra, non li amavo nemmeno quando erano di moda, ho sempre preferito labbra dai colori intensi e opachi, e odio quando i capelli mi si appiccicano alle labbra, cosa che succede regolarmente quando indosso un lucidalabbra. Purtroppo le Memebox non vengono più spedite in tutto il mondo, quindi ho potuto provare solo una delle loro meravigliose scatole!

Vediamo come viene descritto il prodotto: arricchito con olio di oliva, questo lucidalabbra bianco perlato e beige risulta incolore una volta applicato, ma rende le labbra più piene e luminose, le idrata e ha una consistenza non appiccicosa. Formato regolare prezzo 16 $ per 7 ml.
revecen_moisture_shine_lipgloss_review

Cosa mi piace: è contenuto in un tubo trasparente con il classico applicatore per gloss. È facile da stendere, non è troppo pastoso e ha una consistenza leggera, cosa piuttosto rara per un lucidalabbra per quella che è la mia esperienza. Il colore che ho ricevuto è trasparente con glitter argentati e mi piace molto perché mi ricorda le ali di fata o le gocce di rugiada; applicato da solo dà molta luminosità e si accende di tanti riflessi quando viene colpito dalla luce, ma a me piace usarlo anche sopra i rossetti per rendere le labbra più piene o per cambiare leggermente il colore del rossetto. Funziona perfettamente perché, avendo una consistenza molto sottile, non appiccica le labbra, aggiunge solo un tocco di luminosità piuttosto discreto! Non sbava perché ha proprio la consistenza perfetta, posso anche usarlo senza una matita labbra se preferisco, senza preoccuparmi di ritrovarmelo su tutto il viso. È pieno di glitter ma non sono grossi, io non li sento assolutamente sulle labbra. La durata è media.

Cosa non mi piace: è uno dei migliori lip gloss che abbia mai provato, se devo trovargli un difetto direi che è un po’ troppo costoso per i miei gusti: non spenderei 16$ per nessun tipo di lip gloss, per nessun motivo, perché è un tipo di prodotto che uso pochissimo. Se a voi invece piacciono i lucidalabbra vi consiglio di provarlo perché è molto confortevole sulle labbra ed è veramente carino.

Il mio verdetto: se dovessi comprare un lucidalabbra comprerei questo principalmente per la sua consistenza, leggera e confortevole, e anche per i finissimi glitter in esso contenuti. Lo promuovo, se amate le labbra lucide vi piacerà moltissimo.


Monday 26 March 2018

purple glam nail art


Hi fairies,
This nail art looks really complicated but all you need is a steady hand and some patience! I painted my nails with a purple nail polish and then I went for a dark purple French mani;
If your nails are quite long you can go for a French nail art but mine are short so I painted my nails half and half, , and then I drew just the outline of three petals; I added a rhinestone in the middle and with a striping brush I added two black curves, and that was it, I hope you like it!


purple_glam_nail_art

Italian version:

Ciao fatine,
questa nail art sembra molto complicata ma in realtà vi serve solo la mano ferma e un po’ di pazienza! Ho dato due passate di smalto viola a tutte le unghie e poi ho realizzato una french color viola scuro;
Se le vostre unghie sono piuttosto lunghe potete optare per una french mani, ma le mie sono abbastanza corte quindi le ho dipinte dividendole a metà con una linea diagonale, e poi ho disegnato solo il contorno di tre petali; ho aggiunto un cristallo al centro e, con uno striping brush, ho aggiunto due linee nere curve, ed è tutto, spero vi piaccia!

purple_glam_nail_art

Products used:

kiko nail care 3 in 1 fortifying base and top coat

kiko soft nudes nail lacquer no 002

kiko power pro nail polish no 05

rimmel salon pro nail polish no 127 gentle kiss

purple_glam_nail_art


Saturday 24 March 2018

Eye makeup look: green gradient liner


Hi fairies,
I think a classic grey/black smokey eye can be spiced up by using colourful liners, it’s a way to achieve different looks with a minimum effort! Today I went for black and green, which is a shade I often neglect, and I started by packing on a charcoal grey eyeshadow all over my lid keeping it below my crease; I blended the edges bringing the color up in my crease and I repeated these two steps till I had the color pay off I was looking for. In my crease I blended out a lighter gray and then I applied a shimmery vanilla as my browbone highlighter, while in my inner corner I chose a white green duo chrome eyeshadow. I drew a winged liner with a white liquid liner and I went over it with two green shadows, starting with the dark one in the inner corner and the lighter one in the middle to get an ombre liner; I completed the look with mascara, and that was it, I hope you like it!


eye_makeup_look_green_gradient

eye_makeup_look_green_gradient

eye_makeup_look_green_gradient

Italian version:

Ciao fatine,
Credo che un classico smokey eye nero o grigio possa essere ravvivato usando eye liner colorati, è un modo per ottenere look diversi con uno sforzo minimo! Oggi ho optato per nero e verde, che è un colore da me spesso trascurato, e ho iniziato picchiettando un ombretto grigio scuro sulla palpebra mobile facendo attenzione a mantenermi sotto la piega dell’occhio; ho sfumato i contorni portando il colore nella piega, e ho ripetuto questi due passaggi fino ad ottenere l’intensità di colore che desideravo. Nella piega dell’occhio ho sfumato una tonalità di grigio più chiaro e poi ho applicato un ombretto color vaniglia luminoso come illuminante dell’arcata sopraccigliare, mentre nell’angolo interno dell’occhio ho scelto un ombretto duo chrome bianco e verde. Ho tracciato una riga di eyeliner con un eyeliner bianco e poi sono andata a ripassarci sopra con due ombretti verdi, partendo da quello scuro nell’angolo interno e quello più chiaro al centro; ho completato il look con del mascara, ed è tutto, spero vi piaccia!


eye_makeup_look_green_gradient

eye_makeup_look_green_gradient

eye_makeup_look_green_gradient

Products used:

nyx cosmetics white eyeshadow base

kiko cosmetics water eyeshadow nr 106 space charcoal

urban decay cosmetics eyeshadow naked 2

urban decay cosmetics eyeshadow w.o.s.

urban decay cosmetics eyeshadow crave

mac cosmetics foiled eyeshadow magic in your eyes

kiko cosmetics water eyeshadow nr 26

kiko cosmetics colour sphere eyeshadow nr 23

nyx cosmetics vivid brights liquid liner nr 07 vivid envy

kiko super colour liquid liner nr 105

lime crime liquid liner in lunar sea

colourpop shock shadow in belladonna

kiko cosmetics kajal kohl pencil nr 111

kiko over blown mascara

Friday 23 March 2018

One product review nyx matte but not flat foundation


Hi fairies,
I would have never purchased a low cost foundation till a couple of years ago, I thought they all performed poorly and I’d rather spend more for a good result. I don’t know if my perspective changed or if low cost brands improved their foundations, I guess it’s a bit of both, but I have recently tried great low cost foundations totally comparable to high end ones and, in some cases, better than them!

Let’s see how this foundation is described: Now available in 10 more gorgeous shades, Stay Matte But Not Flat Liquid Foundation provides full coverage with a mineral enriched matte finish and accommodates more skin tones than ever before. The oil-free and water-based formula is perfect for both day and nighttime wear. Price 7.50 $ for 35 ml.


nyx_stay_matte_not_flat_foundation_review

What I like: 10 shades are considered quite a good color range for a low cost foundation, you’ll probably find your matching shade easily. You get 35 ml of product, 5 ml more of average foundations, so it’s even cheaper than it seems. The consistency is not too liquidy but it’s not thick neither, it’s easy to apply and to distribute evenly on your face, you don’t have to rush as it doesn’t get dry in a matter of minutes. It does set though, and it lasts all day. I love applying it with a flat dense foundation brush because it gives my skin a flawless look, coverage is high, it minimizes pores without setting in them and, if you don’t have many imperfections and discolorations, you might not need concealer. For a more natural look I use a beauty blender. I set it with powder as I always do but, if your skin is dry, you could skip this step. It doesn’t fade away during the day, it doesn’t look patchy nor cakey and it holds up well when it’s hot as well. It’s oil free so I recommend for oily skin like mine.

What I don’t like: when it’s really hot I start to look shiny on my forehead and nose after 4/5 hours, which is not too bad but there are foundations that last longer than that so I prefer using it in fall and winter. I think it might emphasize dry areas in case you have some, I wouldn’t suggest it to people with very dry skin.

My verdict: I have already repurchased it as it’s one of my favorite low cost foundations, it’s affordable, it performs well, my skin looks flawless, it’s buildable and when I’m out all day I don’t have to worry about how it looks because I know it looks good for several hours!

Italian version:

Ciao fatine,
Fino a un paio di anni fa non avrei mai comprato un fondotinta low cost, pensavo che fossero tutti di scarsa qualità, e preferivo spendere di più ma essere sicura del risultato. Non so se ho cambiato punto di vista o se le marche low cost hanno migliorato la qualità dei loro prodotti, credo che siano accadute entrambe le cose, ma di recente ho scoperto degli ottimi fondotinta low cost che non hanno nulla da invidiare, e in alcuni casi sono addirittura migliori, di quelli più costosi!

Vediamo come viene descritto questo fondotinta: Il fondotinta liquido Stay Matte but Not Flat offre una copertura medio/alta e un finish opaco sul viso. La sua formula a base di acqua si stende facilmente, non risultando pesante sul viso. Prezzo 7.50 $ per 35 ml.

nyx_stay_matte_not_flat_foundation_review

Cosa mi piace: 10 tonalità sono considerate parecchie per un prodotto low cost, probabilmente troverete il colore giusto per voi con facilità. La quantità di prodotto è 35 ml, quindi si hanno 5 ml in più rispetto al formato standard, perciò è ancora più economico di quello che sembra. Ha una consistenza non troppo liquida ma nemmeno troppo densa, è facile da applicare e stendere uniformemente sul viso , non serve affrettarsi dal momento che non si secca rapidamente ma, comunque, si  fissa e dura tutto il giorno. Preferisco applicarlo con pennello piatto a setole fitte perché la pelle risulta impeccabile, la copertura è alta, minimizza i pori e non ci si infila e, se non avete molte imperfezioni e discromie, il correttore può non servire. Per un risultato più naturale uso, invece, la beauty blender. Lo fisso con la cipria come mia abitudine ma, se avete la pelle secca, potete anche saltare questo passaggio. Non sbiadisce durante il giorno, non crea chiazze e non risulta pastoso, ha una buona resa anche con il caldo. È oil free quindi lo consiglio ha chi ha la pelle grassa come la mia.


Cosa non mi piace: quando fa molto caldo mi lucido sulla fronte e sul naso dopo circa 4/5 ore, il che non è un cattivo risultato, ma ci sono fondotinta nella stessa fascia di prezzo che hanno una resa migliore, quindi preferisco usarlo in autunno e in inverno. Credo che vada ad enfatizzare le zone del viso molto secche quindi, se ne avete, non ve lo consiglio.

Il mio verdetto: l’ho già riacquistato perché è uno dei miei fondotinta low cost preferiti, è economico, ha una buona resa, perfeziona la pelle, è modulabile e, quando sono fuori tutto il giorno, non devo preoccuparmi di ritoccarlo perché so che rimane perfetto per diverse ore!


Thursday 22 March 2018

Penguin nail art


Hi fairies,
Do you like penguins? I do, they’re so cute and chubby, they make me smile when I see them!  I went for a baby blue background and, when it was dry, I painted the shape of a penguin’s head using a white nail polish and its brush. With a dotting tool I added black eyes and with pink I drew a nose and its little feet, shaped like hearts, and that was it, I hope you like it, it’s very simple and quick but it looks really nice!


penguin_nail_art


penguin_nail_art

Italian version:

Ciao fatine,
Vi piacciono I pinguini? A me sì, sono così carini e cicciottelli, mi fanno sorridere quando li vedo! Ho scelto uno sfondo azzurro cielo e , dopo che si è asciugato, ho dipinto la forma della testa di un pinguino usando uno smalto bianco e il suo applicatore. Con un dotting tool ho aggiunto gli occhi neri e con il rosa ho disegnato il naso e le zampette, che hanno la forma di due cuori, ed è tutto, spero vi piaccia, è molto semplice e veloce ma il risultato è veramente simpatico!

penguin_nail_art
Products used:

kiko nail care smooth base coat

kiko nail care gel look ultra glossy effect top coat

kiko power pro nail polish no 101

kiko power pro nail polish no 48

zoya pixie dust nail lacquer in bay

essence nail polish no 70 in makes me weak

penguin_nail_art


Wednesday 21 March 2018

Eye makeup look lemon drop


Hi fairies,
My love for yellow eyeshadow has grown a lot in the last couple of years, I really like using it in spring and summer, I think it looks great! For this look I opted for a brown cut crease as I think brown is the best matching color for yellow, and I started defining my crease with a precision brush: I traced a line where the natural crease of my eye is and then I blended the color up. I added a taupe eyeshadow around the edges of the brown to create a nice gradient. On my lid I applied a yellow eyeshadow and in the outer corner I patted a bit of orange eyeshadow to give more dimension to the look. I completed my makeup with a winged liner and some mascara, and that was it, I hope you like it!

eye_makeup_look_lemon_drop

eye_makeup_look_lemon_drop

eye_makeup_look_lemon_drop

Italian version:

Ciao fatine.
Il mio amore per l’ombretto giallo è cresciuto molto negli ultimi anni, mi piace usarlo in primavera e in estate, secondo me il risultato è molto bello! Per questo look ho optato per una cut crease marrone, perché penso che l’abbinamento col giallo sia il migliore, e ho iniziato a definire la piega con un pennello di precisione: ho tracciato una linea nella mia naturale piega dell’occhio e poi ho sfumato il colore verso l’alto. Ho aggiunto un ombretto color talpa sui bordi del marrone per creare una sfumatura omogenea.  Sulla palpebra mobile ho applicato un ombretto giallo e nell’angolo esterno ho picchiettato un pizzico di ombretto arancione per dare più dimensione al look. Ho completato il makeup con una riga di eyeliner e del mascara, ed è tutto, spero vi piaccia!


eye_makeup_look_lemon_drop

eye_makeup_look_lemon_drop

eye_makeup_look_lemon_drop

Products used:

nyx cosmetics waterproof eye primer

nyx cosmetics jumbo eye pencil no 604 in milk

urban decay cosmetics eyeshadow in faint

colourpop powder shadow in tiki

kiko cosmetics smart eyeshadow no 10

urban decay cosmetics eyeshadow in foxy

milani mono eyeshadow no 07 bella white

kiko cosmetics kajal kohl pencil no 101

kiko fine line pen liner

la girl booming lash mascara


Tuesday 20 March 2018

One product review: wet n wild Megalast Liquid Catsuit Matte Lipstick


Hi fairies,
I’m addicted to liquid lipsticks, I wear them 90% of the times because they last all day without smudging, they look great on my lips and I don’t have to touch them up, so I’m always eager to try new ones and, most of all, to try low cost ones! When wet n wild launched its liquid lipstick line I purchased one, so let’s see how the line is described: What glides on like butter, feels like a second skin and won’t budge? Our Liquid Catsuit Matte Lipstick! Made with glammed out superpowers, it goes on glossy yet transforms into a high - pigmented matte finish with some serious staying power. Read our lips This color is going nowhere.  Price 4.99 $- 5.00 €
  Glides on glossy and transforms into high - pigmented matte finish
  Lightweight formula made with serious staying power
  Intense pigmentation without drying the lips


What I like: the packaging is the same of other famous brands like jeffree star and sugarpill, it’s see through and not bulky at all, perfect to fit in your purse. The formula is not too liquid but the product glides on really easily, it’s even and I get a full coverage result with only one layer even though my shade is a light one, which is great! It sets in a matter of seconds, it doesn’t feel too dry on my lips but keep in mind I rarely experience dryness with liquid lipsticks. If your lips are very dry they will feel even drier, it’s inevitable with these products. It doesn’t smudge and it stays in place for a long time: if I don’t eat it’s still perfect at the end of the day, if I eat it might need a touch up in the middle but all in all it performs really well. For 5 € it’s a great liquid lipstick, comparable to more expensive ones, great value in my opinion! It’s really no transfer, it doesn’t stain glasses or cutlery. It doesn’t set into fine lines, it actually gives my lips a velvety finish and it makes them look plump.


What I don’t like: the only thing I don’t like is the very basic color range, I hope they’ll add more shades in the future because the formula is really good!

My verdict: what are you waiting for? Go get one of these liquid lipsticks, you’ll love them I promise!

photo by www.shecharming.com


Italian version:

Ciao fatine,
Sono dipendente dai rossetti liquidi, li uso il 90% delle volte perché durano tutto il giorno e rimangono al loro posto, mi piace molto il loro effetto sulle mie labbra e non devo preoccuparmi di ritoccarli, ecco perché sono sempre aperta a provarne di nuovi, specialmente se si tratta di prodotti low cost! quando wet n wild ha lanciato questa linea di rossetti liquidi ne ho acquistato uno, perciò vediamo subito come viene descritta la linea: cos’è che scivola come il burro, sembra una seconda pelle e non sbava? I nostri Liquid Catsuit Matte Lipstick! Fatti con eccezionali superpoteri , sono lucidi all’applicazione ma si trasformano in una finitura opaca ad alta pigmentazione e a lunga durata. Leggete le nostre labbra: questo colore non andrà da nessuna parte. Prezzo 4.99 $- 5.00 €.
Lucido all’applicazione si trasforma in un prodotto dalla finitura opaca e ad alta pigmentazione
Formula leggera a durata estrema
Pigmentazione intensa che non secca le labbra


Cosa mi piace: la confezione è la stessa di altre marche famose come Jeffree Star e Sugarpill, trasparente e non ingombrante, perfetta da mettere in borsetta. Non ha una  formulazione molto liquida ma il prodotto scivola bene sulle labbra, è omogeneo e ottengo una copertura totale con una sola passata anche se ho acquistato una tonalità chiara, il che è fantastico! Si fissa nel giro di pochi secondi e non rende le labbra secche, ma tenete presente che io raramente ho problemi di secchezza con i rossetti liquidi. Se avete le labbra molto secche probabilmente diventeranno ancora più secche, è inevitabile con questo tipo di prodotti. Non sbava e rimane al suo posto molto a lungo: se non mangio è ancora perfetto a fine giornata, se mangio può aver bisogno di un ritocco al centro delle labbra, ma nel complesso si comporta benissimo. Per 5 € è un ottimo rossetto liquido, che non ha niente da invidiare a quelli di marchi prestigiosi, acquistarlo è un affare! È veramente no transfer, non lascia impronte sui bicchieri o sulle posate. Non si infila nelle pieghe naturali delle labbra, anzi ha una finitura vellutata e le rimpolpa.

photo by www.blushingnoir.com

Cosa non mi piace: l’unico difetto di questo prodotto è la gamma colori limitata, spero che in futuro aggiungano nuove colorazioni perché la formulazione è veramente eccezionale!

Il mio verdetto: cosa state aspettando? Andate a comprare uno di questi rossetti liquidi, sono sicura che li amerete!


Featured post

World of beauty neroli vivace nuova linea / new line

Hi fairies, I’m very pleased to have the chance to try the new Neroli Vivace line by World of beauty and I’m thrilled to talk about it to...