Tuesday 31 October 2017

One product review nyx hd finishing powder

Hi fairies,
If I had to choose only three or four products to do my makeup you can be sure face powder would be one of them, for me is a must have because I’ve got oily skin and I love a matte finish! A good face powder doesn’t only keep shine at bay but it also minimizes pores and fine lines, it makes your skin look overall better so I’m always eager to try new ones even though I’ve got a couple of favorites but, without trying new products I would never know if there are better ones!

Let’s see how this face powder is described: A lightweight, translucent finishing powder that helps soften the appearance of fine lines and pores. NYX Cosmetics HD Finishing Powder is a silky pressed powder with a fresh, matte finish. Price 9.99 $ - 11.00 €

nyx_hd_finishing_powder_review


What I like : the packaging is sleek and lightweight, perfect to travel in your purse without being bulky, it won’t open by mistake as it’s got a safe closure. The powder has got a very fine texture, comparable to Mac prep and prime face powder, it’s translucent so it matches any skin tones and it won’t change your foundation color, it doesn’t look cakey, it’s actually very lightweight and silky and it looks really natural. It’s easy to apply and to blend, it minimizes pores and fine lines just as it claims, I love that my skin looks blurred as if I applied a photo filter! It works well to set the under eye area as well. It mattifies and it keeps shine at bay for 6/7 hours, a great performance for a low cost product!

What I don’t like: I hit pan quite fast, it doesn’t last too long, I finished it in a couple of months. It’s a bit powdery and that could be one of the reasons why I ran out of it so fast. If your skin is dry it might emphasize dry patches.

photo by www.beautydea.it

My verdict: I’ll definitely repurchase it, it performs better than some high end face powders I’ve tried, I’m happy with how my skin looks and it keeps shine at bay without looking cakey, I would recommend it to people with normal to oily skin!

Italian version:

Ciao fatine,
Se dovessi scegliere solo quattro o cinque prodotti di makeup da poter usare sicuramente la cipria sarebbe tra questi, per me è indispensabile perché ho la pelle grassa e amo l’effetto opaco! Una buona cipria non solo opacizza, ma attenua anche l’aspetto delle piccole rughe e dei pori, dà alla pelle un aspetto migliore in generale, quindi sono sempre entusiasta di provarne di nuove anche se ne ho un paio che preferisco ma, se non provassi nuovi prodotti, non potrei mai scoprirne di migliori!

vediamo come viene descritta questa cipria:
Una cipria leggera dal finish opaco per chi non teme i riflettori. La soluzione perfetta per attenuare imperfezioni e pori della pelle, da scegliere tra tre diverse gradazioni. Prezzo 9.99 $ - 11.00 €


cosa mi piace: la confezione è sottile e leggera, perfetta da mettere in borsa senza ingombrare troppo, sicuramente non si aprirà per sbaglio visto che ha una chiusura sicura. La polvere ha una grana finissima, simile a quella della polvere Mac prep and prime, è trasparente quindi si adatta a qualsiasi carnagione senza modificare il colore del vostro fondotinta, non appesantisce, anzi è molto leggera e setosa e regala un effetto naturale. È facile da applicare e da sfumare, minimizza i pori e le piccole rughe proprio come promette, mi piace l’effetto “sfuocato” che dà alla pelle, come se avessi applicato un filtro! Va bene anche per fissare la zona del contorno occhi. Opacizza e mantiene la pelle opaca per circa 6/7 ore, un ottimo risultato per un prodotto low cost!

cosa non mi piace: ho bucato la cialda abbastanza velocemente, non dura molto, l’ho finita in un paio di mesi. È piuttosto polverosa, che potrebbe essere uno dei motivi per cui si consuma rapidamente. Se avete la pelle secca potrebbe enfatizzare le zone poco idratate.


Il mio verdetto: la ricomprerò sicuramente, si comporta meglio di alcune ciprie di alta profumeria che ho provato, mi piace l’effetto che ha sulla pelle, mantiene a bada la lucidità senza appesantire il trucco, la consiglio per le pelli da normali a grasse.


Monday 30 October 2017

Eye makeup look teal and purple cut crease

Hi fairies,
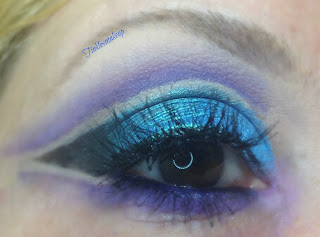
Today I’ve tried to do a negative space cut crease, which means there’s a gap in between the lid and the crease where I didn’t apply any eyeshadow, I left it bare. It’s something relatively new to me, I tried it few other times but I definitely need more practice on this technique; I really like it though, I like trying new looks and challenging myself, and I hope you’ll like it too!
I started by shaping the outer wing with black eyeshadow and I drew a line with the same eyeshadow to cut my crease but I stopped halfway, I didn’t go to the inner corner; I filled the shape in with black and then I applied a metallic aqua eyeshadow in the inner half of my lid; in the middle of my lid I applied a shimmery royal blue eyeshadow. I didn’t blend any of these eyeshadows up because I was going for a cut crease so I wanted a defined shape. With a matte purple eyeshadow I cut my crease leaving a gap between the previously applied eyeshadows and the line I was drawing, and I blended the purple upward. I smoked the purple in my lower lashline and I completed the look with a winged liner and mascara, and that was it!

eye_makeup_look_teal_purple_cut_crease

eye_makeup_look_teal_purple_cut_crease

eye_makeup_look_teal_purple_cut_crease

Italian version:

Ciao fatine,
Oggi ho provato a cimentarmi in una cut crease con negative space, il che vuol dire che ho lasciato uno spazio tra la palpebra e la cut crease in cui non ho applicato nessun ombretto, l’ho lasciato al naturale. È per me una tecnica relativamente nuova, l’ho provata qualche altra volta ma ho sicuramente bisogno di prendere di più la mano, però devo dire che mi piace molto perché amo provare nuovi look e mettermi alla prova, e spero che piaccia anche a voi!
Ho iniziato tracciando una codina con dell’ombretto nero e, con lo stesso ombretto, ho tracciato una linea nella piega dell’occhio fermandomi a metà, senza andare fino all’angolo interno; ho riempito la forma col nero e poi ho applicato un ombretto azzurro dalla finitura metallica nella metà interna della palpebra mobile; al centro della palpebra ho picchiettato un ombretto blu elettrico dal finish luminoso. Non ho sfumato i bordi di nessuno di questi ombretti perché volevo realizzare una cut crease e desideravo che la forma fosse ben definita. Con un ombretto viola opaco ho definito la cut crease lasciando uno spazio vuoto tra gli ombretti precedentemente applicati e la linea che stavo tracciando, e ho poi sfumato il viola verso l’alto. Ho sfumato il viola anche nella rima inferiore, e ho completato il look con una riga di eyeliner e del mascara, ed è tutto!

eye_makeup_look_teal_purple_cut_crease

eye_makeup_look_teal_purple_cut_crease

Products used:

nyx cosmetics eyeshadow base in white

urban decay eyeshadow in crave

about face loose pigment in trophy wife

fyrinnae loose pigment in digital faerie

kiko infinity eyeshadow nr 253

kiko infinity eyeshadow nr 248

urban decay eyeshadow in w.o.s.

kiko smoky eye pencil nr 03

kiko waterproof definition eyeliner


kiko overblown mascara

Sunday 29 October 2017

One product review kiko skin tone corrector

Hi fairies,
I tried this product out of curiosity when it was on sale without expecting too much, and now I can’t live without it! I shouldn’t have said that at the beginning because it gives away what I think of it , but I couldn’t help it!
Color correcting is now becoming very popular but it has to be done the right way else the result may be not flattering at all; it’s better to start with a slight amount of product, that way you can’t be wrong.
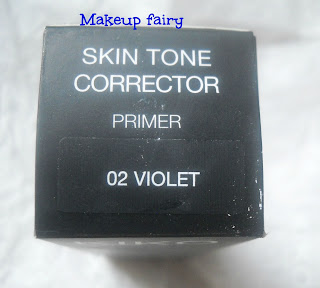
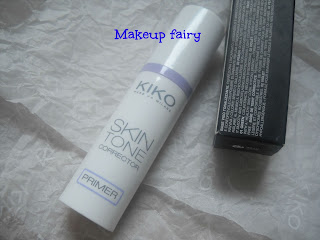
Kiko skin tone corrector is available in three shades, peach, lavender and green; I use the lavender one to brighten up my skin tone. Let’s see how it’s described: Its lightly toned texture allows the concealing and neutralizing of visible skin discolourations, evening out the skin tone.
Thanks to the Diamond powder, Skin Tone Corrector Primer captures the light and delicately reflects it over the entire face, giving it an extraordinary diffused radiance.
Its gliding formula, with a pleasurable velvety touch, ensures long lasting comfort and an ultra-light sensation on your face.

kiko_skin_tone_corrector_review

Available in 3 shades, each specific for particular needs:
01 Green: ideal for contrasting pink discolourations such as rosacea, capillaries and blemishes.
02 Violet: revitalizes flat shades and warms yellowish skin tones.
03 Peach: ideal for all skin tones that would like to find the "healthy skin" effect.

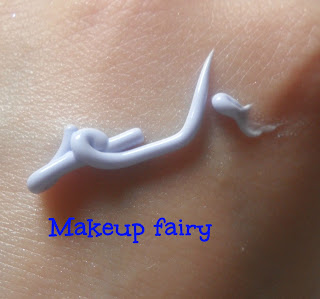
What I like : the consistency is liquidy but not runny, easy to apply with your fingers if you like (this is how I apply it because it’s fast) but you can also use a beauty blender or a brush. A little goes a long way, one pump is enough so it will last really long. It gets absorbed really fast and it doesn’t leave any traces on your skin, it’s basically like not having applied it all. I applied it before face primer, I wait few seconds and then I apply my face primer and my face makeup. I’m very fair and I like how this product gets rid of any yellow undertone I might have and it gives my skin more radiance, it looks more ethereal and healthier. It doesn’t affect the performance of my foundation or face primer. It’s not silicone based so it can be an alternative if you don’t like them.
kiko_skin_tone_corrector_review

What I don’t like: let’s not beat around the bushes, the smell is really strong and it’s not pleasant: it’s very citrusy but it’s also chemical and it’s persistent even after the product gets absorbed. It could be off putting for some people, I don’t like it much but it doesn’t bother me and I still use it because the result is good. If you want to get ready fast this might be just another step you have to add to your makeup routine and you might not want to.

My verdict: I’ve already repurchased more than once and I will when I run out of it, I don’t use it everyday, some days I skip it because I need to get ready fast but, when I got time, I always reach for it because my complexion looks whiter and even when I apply it and I love it!

kiko_skin_tone_corrector_review

Italian version:

Ciao fatine,
Ho provato questo prodotto per curiosità quando era in saldo senza aspettarmi troppo, ed ora non ne posso fare a meno! Non avrei dovuto dirlo subito perché, in questo modo, si capisce cosa ne penso, ma non sono riuscita a trattenermi!
Ormai la correzione di tono è diventata popolare ma deve essere fatta nel modo corretto, altrimenti può non dare il risultato desiderato; è meglio iniziare con piccole quantità di prodotto, in questo modo non si può sbagliare.
kiko_skin_tone_corrector_review

Il kiko skin tone corrector è disponibile in tre tonalità: pesca, lavanda e verde. Io uso quella lavanda perché mi illumina l’incarnato. Vediamo come viene descritto: la sua texture delicatamente colorata permette di coprire e neutralizzare le discromie evidenti, uniformando l’incarnato.
Grazie alla polvere di diamante, Skin Tone Corrector Primer cattura la luce e la riflette delicatamente su tutto il viso, donandogli un’incredibile luminosità.
La sua formula fluida, piacevolmente vellutata al tatto, garantisce lunga durata e confortevolezza e una sensazione ultra leggera sul viso.
Disponibile in tre tonalità, ognuna specifica per ogni problema
01 Verde: ideale per contrastare discromie rosa, ad esempio quelle causate dalla rosacea, dai capillari e da imperfezioni.
02 Lavanda: dà vitalità agli incarnati spenti e riscalda le carnagioni con sottotono giallo.
03 Pesca: ideale per tutte le carnagioni e per chi vuole dare alla propria pelle “l’effetto salute”.

Cosa mi piace: ha una consistenza liquida ma non troppo che rende l’applicazione con le dita semplice (questo è il modo in cui io lo applico), ma si può anche usare una beauty blender o un pennello. Ne basta una minima quantità, una dose è sufficiente per tutto il viso quindi la confezione dura veramente a lungo. Si assorbe molto velocemente e non lascia residui sulla pelle, praticamente è come non averlo applicato. Io lo uso prima del primer viso, aspetto qualche secondo e poi procedo con il primer viso e il trucco viso. Io ho la carnagione molto chiara e mi piace il modo in cui il prodotto neutralizza qualsiasi traccia di giallo possa avere e anche la luminosità che dona al mio incarnato, dandole un aspetto etereo e sano. Non modifica la resa del primer viso o del fondotinta. Non è a base siliconica quindi può essere un’alternativa se cercate un primer senza siliconi.

kiko_skin_tone_corrector_review

Cosa non mi piace: non giriamoci intorno, ha un odore forte e non proprio piacevole: è un profumo agrumato ma anche chimico che persiste anche dopo che il prodotto viene assorbito. Per alcune persone può essere un deterrente, a me non piace molto ma non mi dà particolarmente fastidio, continuo ad usarlo perché sono soddisfatta del risultato. Se amate prepararvi velocemente potreste non voler aggiungere un ulteriore passaggio alla vostra makeup routine.


Il mio verdetto: l’ho già ricomprato più di una volta e lo rifarò quando lo finirò, non lo uso tutti i giorni, qualche volta salto il passaggio perché ho necessità di prepararmi in poco tempo ma, quando lo faccio, la mia carnagione risulta più bianca e omogenea, e mi piace moltissimo!


Friday 27 October 2017

Irhair big sales on bundles with lace frontal

Hey ladies! Human hair wigs become a common thing today. 
More and more human hair suppliers are found from the google. 
Let me introduce irhair.com. We are a trusted virgin human hair supplier with quality guaranteed products, cheap lace front wigs, full lace wigs, Brazilian virgin hair, Peruvian virgin hair, indian virgin hair, bundles with lace closure, lace frontal closure and so on. All of their products are made from 100% real human hair. And they have a 30-day guarantee, if you receive hair that you do not like, you can send it back & receive a refund or you also can exchange it. We want you to have the best customers experience with us irhair.
Now they have big sales on bundles with lace frontal. In general, lace frontal is in 4*13inch. It allows you to have a wig without leaving out any hair and create a realistic looking.
We strongly recommend to try them if you need virgin human hair with affordable price and high quality. 


Thursday 26 October 2017

One product review crazy color hair dye

Hi fairies,
My hair is strawberry blonde with platinum strands but my goal is to get a silver blond and I’ll probably end up going to a salon to get it fixed, but in the meantime I’ve been trying several products to get rid of the brassiness. I lightened my hair quite a lot in the last year, but it’s still brassy, which I hate! I should bleach it, I did it in the past but it got really damaged so I think I’ll let a professional hair stylist do it, but I decided to try crazy hair color in silver to see if it helped a bit.
Let’s see how they are described: Crazy Colour Semi-permanent bright & bold hair colour!
To get the best result from your Crazy Color hair dye we recommend you use it on pre-lightened hair, but it can also be used as a tint on natural hair.
This dye is a semi-permanent colour which means it will fade with every wash, but should last approx 4-8 washes depending on hair condition & type. Price 4.00 $ for 100 ml.

crazy_color_hair_dye_review

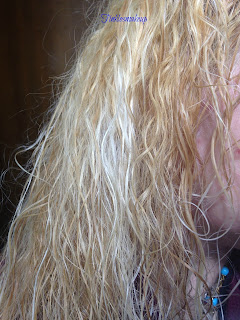
How to use it: on their website and on any retailers’ website they say to wash your hair, dry it with a towel and apply the product on damp hair. They recommend to wear gloves to prevent the colour from stain your skin, especially if you use dark shades, and to protect your skin from chemicals. I followed instructions, so I first dye my roots, I washed my hair and I towel dry it. This is what it looks like, as you can see it’s a bit brassy.

 I distributed crazy colour hair color thoroughly, it’s very easy as it’s quite liquid, the consistency is like most hair conditioners’, and once I was done I clipped my hair up and I let it sit for thirty minutes. I then rinsed it away and basically it didn’t do much. It did nothing to my roots, it just worked a bit on my ends, which are almost white. I repeated these steps each month for three months and the result was always the same, and I was pretty disappointed because, let’s face it, I can definitely skip it and nobody would notice!
I did a bit of research and I found out it’s best applied on dry hair, and that really surprised me because it was clearly stated to apply it on damp hair, I couldn’t understand why the brand would give a wrong tip, but it is what it is, I think it’s especially true with light colors such silver, color penetrates your hair better if it’s dry. The result is a bit more noticeable even though it’s far from being bright silver, but I like it way more. I haven’t tried any other shades but I’m sure dark shades perform better.
To make the color last as long as possible they recommend to rinse your hair with cold water and to avoid swimming and sunbathing. It fades away after 4-5 washes on my hair.
My verdict: it’s not as strong as I wish it was and it doesn’t get rid of brassiness the way I wish it did, but I keep buying it and applying it each month because it does give my hair silver hues and for the price point I think I couldn’t ask for more. It doesn’t damage my hair, it’s easy to apply and I’m thinking of trying some other shades, if I don’t like it it will fade away pretty fast anyway so it’s not a big deal!

crazy_color_hair_dye_review


Italian version:

Ciao fatine,
Ho i capelli biondo ramato con le punte platino ma vorrei arrivare a un biondo argento e credo che andrò da un parrucchiere professionale per farlo, ma nel frattempo sto provando diversi prodotti per eliminare il giallo. Nell’ultimo anno ho schiarito parecchio i capelli, ma hanno ancora un tono arancione che odio! Dovrei decolorarli, l’ho fatto in passato ma si erano rovinati tantissimo, ecco perché credo che sia meglio affidarsi alle mani di un professionista, però ho voluto provare i colori Crazy Colour per vedere se potevano aiutare almeno un po’.
Vediamo come sono descritti: 32 nuance facili da usare, prive di  ammoniaca, capaci di nutrire e rigenerare i capelli. Per le nuove generazioni: esotici e vibranti colori su capelli decolorati; luminose, translucenti intensità di colore su capelli naturali. Prezzo 4.00 $ per 100 ml.

crazy_color_hair_dye_review

Come si usa: sul sito ufficiale e su quello di ogni loro distributore viene suggerito di lavare i capelli, asciugarli con un asciugamano e applicare il prodotto sui capelli umidi. Consigliano di indossare guanti per evitare che il colore macchi la pelle delle mani e per evitare il contatto con agenti chimici. Ho seguito le istruzioni, ho prima tinto i capelli, li ho sciacquati e tamponati con un asciugamano. Ecco come erano, potete vedere che c’è ancora del giallo.
crazy_color_hair_dye_review

 Ho distribuito il colore Crazy Color uniformemente sui capelli, operazione molto semplice visto che ha una consistenza piuttosto liquida, simile a quella della maggior parte dei balsami, ho fermato i miei capelli con un mollettone per non sporcarmi e ho lasciato agire per circa mezz’ora. Ho poi risciacquato e, in parole povere, il risultato è praticamente invisibile. Sulle radici non ha fatto nulla, mentre è leggermente visibile sulle punte che erano molto chiare. Ho ripetuto questi stessi passaggi ogni mese per tre mesi, e il risultato è stato sempre lo stesso, praticamente nullo, ed ero delusa perché, diciamocelo chiaramente, avrei potuto tranquillamente non usare il prodotto e nessuno se ne sarebbe accorto.
Ho fatto, allora, qualche ricerca online e ho scoperto che è meglio applicarlo sui capelli asciutti e questo mi ha molto sorpreso perché sul loro sito viene detto chiaramente di applicarlo sui capelli bagnati, e non capivo come fosse possibile che il marchio stesso desse delle indicazioni sbagliate, ma credo che, specialmente con i colori chiari come l’argento, sia vero che il colore penetra meglio se i capelli sono asciutti. Il risultato è leggermente migliore, i riflessi argento si vedono di più anche se siamo lontani dall’avere un bell’argento intenso, ma devo dire che sono più soddisfatta di prima. Non ho provato altri colori ma sono sicura che quelli scuri hanno una resa migliore.

crazy_color_hair_dye_review

Per far durare il colore il più a lungo possibile raccomandano di sciacquarli con acqua fredda e di evitare l’esposizione al sole e il nuoto. La colorazione sbiadisce dopo 4-5 lavaggi.
Il mio verdetto: non è intenso come vorrei e non elimina il giallo come vorrei, ma continuo a comprarlo e ad usarlo ogni mese perché regala ai miei capelli dei riflessi argentati e, per il prezzo che ha, non credo si possa chiedere di più. Non rovina i capelli ed è facile da usare, sto pensando di provare altre tonalità, se non dovessero piacermi non sarebbe un problema visto che il colore svanisce piuttosto velocemente!
crazy_color_hair_dye_review

crazy_color_hair_dye_review


Wednesday 25 October 2017

Neon flowers nail art

Hi fairies,
In summer I like wearing bright colors on my nails and I hope you do too, they are fun and they make me smile! This nail art is easy and everybody can give it a try, you can draw flowers on an accent nail just or on all your nails, it’s up to you!
I used a silvery blue metallic nail polish as a background shade, and then I painted five petal flowers on each nail: I first used nail paint to shape them, and then I filled them in with bright colors such as pink, yellow, blue and fuchsia! That’s it, I hope you like it!


neon_flowers_nail_art


neon_flowers_nail_art

Italian version:

Ciao fatine,
In estate mi piace usare colori intensi sulle unghie e spero che piaccia anche a voi, sono divertenti e mi mettono di buonumore! Questa nail art è facile e tutti possono provare a farla, potete disegnare i fiori solo su un’unghia per un accent manicure, oppure su tutte le unghie, la scelta sta a voi!
ho usato uno smalto metallico argento con riflessi blu come colore di sfondo, e poi ho disegnato dei fiori a cinque petali su ogni unghia: prima ho dipinto i contorni con del nero, e poi li ho riempiti con colori brillanti come il rosa, il giallo, il blu e il fucsia! È tutto, spero vi piaccia!

neon_flowers_nail_art

neon_flowers_nail_art

Products used:

kiko nail care 3 in 1 shine fortifying base and top coat

catrice nail lacquer travellight story 02

kiko power pro nail lacquer no 101

kiko nail polish no 360

kiko quick dry nail polish no 835


Americana acrylic paint in black, white, yellow

Tuesday 24 October 2017

Eye makeup look golden olive

Hi fairies,
I thought of using bright colors today, even though I don’t think olive green looks too good on me but it will look good on many of you, so it’s a suggestion for a summery and fun makeup look! Whoever thinks yellow isn’t easy to wear is wrong, it is and it’s also sexy!
I applied a yellow eyeshadow in the inner third of my lid being careful not to bring it up to my crease, in the middle of my lid I applied an antique gold with olive shimmer to it and I blended it in the lower half of my crease as well; in the outer corner of my eye I used a matte teal eyeshadow on a blending brush and I worked it into my crease. I added a bit of the same teal in the inner corner using a shader brush to get a brighter color pay off and to give more depth to the look and, as I wasn’t happy with the result, I also added a pinch of black. I used a matte vanilla eyeshadow as my browbone highlighter and I completed the look with a winged line and mascara, and that was it, I hope you like it!
eye_makeup_look_golden_olive

eye_makeup_look_golden_olive

eye_makeup_look_golden_olive

Italian version:

Ciao fatine,
Oggi ho pensato di usare dei colori brillanti anche se non credo che il verde oliva mi stia bene ma, sicuramente, sta bene a molte di voi, quindi potrete prendere spunto per un trucco estivo e divertente! Chiunque pensi che il giallo sia difficile da portare si sbaglia, lo è ed è anche molto sexy!
ho applicato un ombretto giallo nella parte interna della palpebra mobile facendo attenzione a non portarlo nella piega, al centro della palpebra ho applicato un ombretto color oro antico con riflessi verde oliva e l’ho anche sfumato nella metà inferiore della piega dell’occhio; nell’angolo esterno ho usato un ombretto opaco verde petrolio su un pennello da sfumatura, e l’ho poi portato nella piega. Ho aggiunto questo stesso ombretto nell’angolo esterno usando, però, un pennello piatto per ottenere un colore più intenso e dare più dimensione al look ma, non essendo soddisfatta del risultato, ho anche usato un pizzico di nero. Ho usato un ombretto opaco color vaniglia come illuminante dell’arcata sopraccigliare e ho completato il look con una riga di eyeliner e del mascara ed è tutto, spero vi piaccia!

eye_makeup_look_golden_olive

eye_makeup_look_golden_olive

eye_makeup_look_golden_olive

Products used:

nyx cosmetics eyeshadow base in white

mac cosmetics loose pigment in teal

urban decay eyeshadow in faint

urban decay pressed pigment in thrash

sugarpill loose pigment in goldilux

jeffree star beauty killer palette eyeshadow rich bitch

jeffree star beauty killer palette eyeshadow expensive

jeffree star beauty killer palette eyeshadow china white

kiko color sphere eyeshadow nr 35

kiko color definition eyeliner and kajal nr 05

urban decay 24/7 waterproof liquid liner in perversion


kiko over blown mascara

Monday 23 October 2017

Eye makeup look silver and plum

Hi fairies,
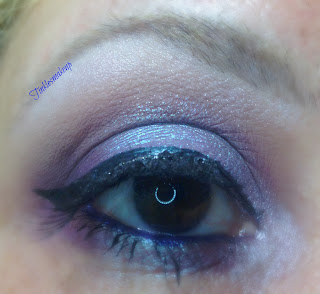
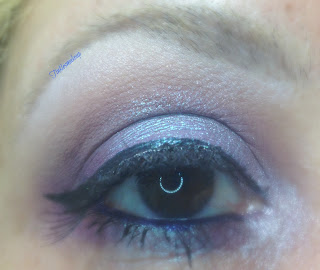
Today I used silver and purple for this look, I think it’s a great color combo that looks classy and it can be toned down to a wearable look, it depends on how vibrant the eyeshadows you pick are!
I started with a matte mauve in my crease as transition color, and then I intensified the outer corner with a matte dark purple and I blended it really well to defuse dark edges. I applied this shade in the inner corner as well and I dragged it in the lower half of my crease, blending and reapplying till I got the color pay off I was looking for. I wanted a quite soft look with a bit of drama, so I needed to blend the colors out but I still wanted them to show. In the middle of my lid I patted a silver pigment and I use a pale pink as my browbone highlighter. I completed the look with a winged liner and mascara, and that was it, I hope you like it!

eye_makeup_look_silver_plum

eye_makeup_look_silver_plum

eye_makeup_look_silver_plum

Italian version:

Ciao fatine,
Oggi ho usato viola e argento per questo look, è una combinazione di colori che mi piace molto e che trovo elegante e, a seconda dell’intensità degli ombretti che si scelgono, può essere anche molto portabile!
ho iniziato applicando un ombretto color malva opaco nella piega dell’occhio come colore di transizione, e poi l’ho intensificato applicando nell’angolo esterno un ombretto opaco color prugna intenso e l’ho sfumato molto bene sui bordi. Ho applicato questo stesso colore anche nell’angolo interno dell’occhio e l’ho poi portato nella metà inferiore della piega, sfumandolo e riapplicandolo fino ad ottenere l’intensità desiderata. Volevo un look abbastanza delicato ma anche drammatico, quindi dovevo sfumare i colori evitando però che svanissero del tutto. Al centro della palpebra ho picchiettato un pigmento color argento e ho usato un rosa pallido come illuminante dell’arcata sopraccigliare. Ho completato il look con una riga di eyeliner e del mascara, ed è tutto, spero vi piaccia!

eye_makeup_look_silver_plum

eye_makeup_look_silver_plum

eye_makeup_look_silver_plum

Products used:

nyx cosmetics eyeshadow base in white

colourpop cosmetics pressed powder shadow silver lining

urban decay eyeshadow in w.o.s.
urban decay eyeshadow in limit

urban decay eyeshadow in foxy

kiko smart colour eyeshadow nr 17

pupa loose pigment nr 001

makeup obsession highglighter nr 104

kiko high pigment wet and dry nr 64

kiko smoky eye pencil nr 03

urban decay 24/7 waterproof liquid liner in perversion

kiko overblown mascara


Sunday 22 October 2017

Eye makeup look: Pokemon Pikachu

Hi fairies,
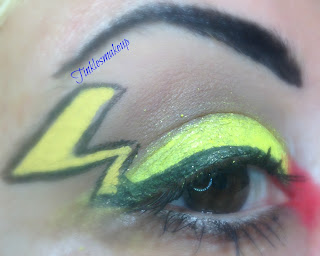
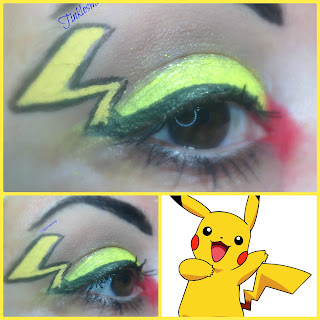
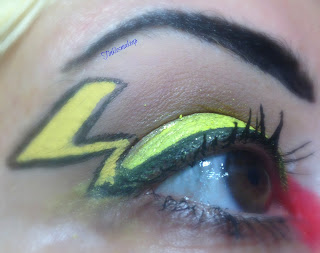
Halloween is getting closer and, if you love pokemons, you could opt for a cosplay makeup inspired by your favorite one! I love Picachu so I got inspired by him for this look! I started by giving my eyebrow the typical lightning bolt shape, and then I cut my crease with a matte brown eyeshadow, blending it very well and adding a lighter brown to create a gradient. On my lid I used a matte yellow eyeshadow. With a black liquid liner I drew the shape of his tail in my outer corner, and I filled it in with yellow. In my inner corner I applied a red eyeshadow, and that was it, I hope you like it!

eye_makeup_look_pikachu

eye_makeup_look_pikachu


Italian version:

Ciao fatine,
Halloween si avvicina e, se vi piacciono I Pokemon, potreste scegliere un makeup cosplay ispirato da quello che preferite! Io amo Picachu, quindi mi sono ispirata a lui per questo look! Ho iniziato dando alle mie sopracciglia la tipica forma a fulmine, e poi ho definito la piega dell’occhio con un ombretto opaco marrone, sfumandolo molto bene e aggiungendo un marrone chiaro per creare una sfumatura omogenea. Sulla palpebra mobile ho applicato un ombretto giallo. Con un eyeliner liquido nero ho disegnato la forma della sua coda nell’angolo esterno dell’occhio, che ho poi riempito di giallo. Nell’angolo interno ho usato un ombretto rosso, ed è tutto, spero vi piaccia!

eye_makeup_look_pikachu

eye_makeup_look_pikachu

eye_makeup_look_pikachu

Products used:

lime crime eyeshadow brightener

urban decay eyeshadow in w.o.s.

urban decay eyeshadow in naked 2

urban decay eyeshadow in faint

colourpop cosmetics shock shadow in glowstix

kiko long wear ultimate pen liner

kiko kajal kohl pencil no 101

kiko infinity eyeshadow no  208

nyx vivid brights liquid liner liquid halo


kiko overblown mascara

Featured post

World of beauty neroli vivace nuova linea / new line

Hi fairies, I’m very pleased to have the chance to try the new Neroli Vivace line by World of beauty and I’m thrilled to talk about it to...